Love Her.
Tuesday, January 3, 2012
Sunday, January 1, 2012
Decoupage Power Wheels???
Yup. I frackin decoupaged Brianlily's Power Wheels! I went with the blue Hot Wheels Power Wheels because my other choice was pink Barbie. She's a girl. I know that, she knows that, but she doesn't need a pink car because of it, and don't even get me started on Barbie. But I didn't want flames on it either. So what am I supposed to do? Oh yeaaaa...it's Mod Podge time (also found out the inventor used it on her VW Beetle in the 60's!)! Really simple and didn't have to ruin the car. The front window had Hot Wheels written across it, so I just cut that part off, then used anything else that didn't have flames. Then I printed out some color images of one of her favorite characters (Olivia. Man who doesn't love that piglet?), and decoupaged them onto the car. I also added some polka dots because I thought it would look cool on the VW Beetle. A racing number, and I was done. Came out adorable! Brianlily loves it, and it's a one of a kind.
Can anyone say Oliviaaaaaaaaaaa!?
P.S. So decoupage crazy these days...in love with these shoes from Corinne @ Craftovision!


Can anyone say Oliviaaaaaaaaaaa!?
P.S. So decoupage crazy these days...in love with these shoes from Corinne @ Craftovision!


Saturday, December 31, 2011
Even Better Chocolate Chip Cookie...
I can't even believe it, but I have to update this post. Sine then, I have found The chewy to be cakey, and I don't like cakey cookies. For a chocolate chip cookie lover like myself, it's a constant search for THE best homemade cookie. And I've found it (for now). Not too crazy about Bobby Flay (I think his personality stinks), but OMG this cookie recipe is insane!! They're soft and chewy on the inside, and crisp on the edges...mouthwatering. Seriously though, it's all in the bake time too. It's like cooking bacon, you have to ake them out just a little raw, so they finish cooking on the pan. LOVE! check it out, try it out, love it, eat it!


Friday, December 30, 2011
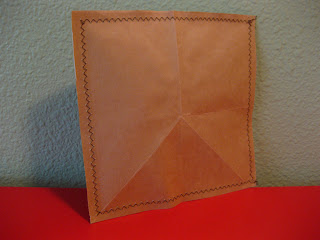
DIY Mailer/Envelope...
Saw this really cute and useful way to send mail and creatively personalize your package. It comes from Whitney @ Whitney Sews. Mine is much smaller, and I didn't line mine with plastic. I actually just used it in place of an envelope. The item (my very first etsy sale! woo hoo!) was inside and I sewed around it, sealing the package. I loved it! Hope to use it more! Especially since plastic bags are banned here now...lots of paper for crafting!


Thursday, December 29, 2011
Revamp Your Tomato Pincusion...
I have been thinking of making a pincushion, because my tomato just doesn't stay put! I need something with weight. I did think about just gluing some non slip grippy pads on the bottom of the tomato, but didn't think it would really hold up. Not sure if anyone else has the same problem of their pincushion just dancing around their work station when using it, but it drives me insane! So when I poked around for some ideas I found out that the tomato isn't just stuffing. It's wool filled, and the strawberry that hangs from it is actually emery (like your nail file). Apparently the wool keeps your needles from rusting, and poking your pins and needles through the strawberry (say before and after each use) keeps them sharp too. Gertie @ Gertie's New Blog for Better Sewing did some research and found out some really cool facts about the tomato pincushion's history.
In my frustration, and after finding out that it's better to just stick to the tomato, I had to come up with something that would allow me to keep it, and get it to stay put. I found these super cute jar ideas, (don't forget, you're not limited to ball jars...check this IKEA jar, a baby food jar, or just use a sauce jar!) and took it a step backward. I just hot glued the tomato on top of the jar! I wanted the jar to be useful for storage, but not for something I need all the time (it would get really annoying really quickly having to take that top off). So I added weight and used it as storage for buttons! I also snipped the strawberry's string and glued it directly onto the tomato. That way it would be a one hand job, instead of two handed. I added a ribbon, and done. Love, love, love my new (old) tomato pincushion!!!


In my frustration, and after finding out that it's better to just stick to the tomato, I had to come up with something that would allow me to keep it, and get it to stay put. I found these super cute jar ideas, (don't forget, you're not limited to ball jars...check this IKEA jar, a baby food jar, or just use a sauce jar!) and took it a step backward. I just hot glued the tomato on top of the jar! I wanted the jar to be useful for storage, but not for something I need all the time (it would get really annoying really quickly having to take that top off). So I added weight and used it as storage for buttons! I also snipped the strawberry's string and glued it directly onto the tomato. That way it would be a one hand job, instead of two handed. I added a ribbon, and done. Love, love, love my new (old) tomato pincushion!!!


Subscribe to:
Posts (Atom)